Lilypie Kids Birthday tickers
Lilypie First Birthday tickers
Lilypie Breastfeeding tickers
Showing posts with label Teaching Mandarin. Show all posts

8/02/2012

Sensory bags for the kids!

I decided to make sensory bags for my kids, with little Alex in mind in particular as I'd like to introduce him to more types of sensory play. 

A sensory bag is basically made up of stuff you put in a bag that won't burst the bag (read: no sharp objects) and yet offers some sensory play for the child. So basically anything goes as long as it doesn't break the bag (e.g. gel, liquid soap, shaving cream, embellishments, buttons etc.). 

Little Alex has played with his leftover food (yes, I let him play with only the leftovers - after all, it's all gonna be thrown away so I might as well let him have a go at it) and he loves to crush cauliflower - somehow he thinks that it isn't food because he never tries to mouth the florets which I give him for finger food. He always crushes the florets and has this look of glee when the florets are in bits and pieces in his palms. Babies.

Since sensory bags can offer safe sensory play for babies, I decided why not?

So I got down to making them for my kids.

Here's the math themed sensory bag for my girl. This was too small a baggie and I have since transferred the stuff into a bigger bag so that we can play I Spy with her. Too small a bag means that all the items are squashed together and it's difficult to play the game.


Items that went in my math themed sensory bag:
  • gel sticker numbers
  • heart-shaped beads
  • some sequins
  • glitter
  • liquid handsoap
  • food colouring


And here's the all things bright and sparkly bag for the baby boy:


Items that went in this bag:
  • liquid handsoap
  • lots of glitter
  • lots of different shaped sequins and embellishments

Remember to tape up the sensory bags to prevent leaking and supervise your children at all times as little teeth and sharp fingernails could pierce the bags.


I added colouring to one of the bags the next day and my girl realised to her delight that she could practise her handwriting! :)

Simply use your fingertips to 'write' on the sensory bag! Here she practised her Chinese strokes but she also happily practised writing alphabets. So wonderful to find another use for my sensory bags since she's not so into squishing the bags!


If you have a preschooler who's learning to write, or if you've a little baby and you want to introduce safe sensory play, give this a try!

I'm gonna try to make a shaving cream sensory bag as well as a water beads sensory bag too... when I get my hands on the materials... :)

Do share your sensory bags on my Facebook page if you make some! 

*edited on 3/8/2010:
Please try to use freezer bags as they are thicker and have a double zip instead of a single one. Mine kept leaking after awhile as I was using normal storage bags.

7/20/2011

Activities to go with The mixed-up chameleon by Eric Carle


The mixed-up chameleon is a colourful and playful story about how a chameleon wishes to be someone else only to find out that what's best for him is really to just be himself. 

We also didn't do many activities for this story as I was trying to minimise the preparation of activities. I don't really have the time and energy to make extensive learning aids for her, and since the new baby will be arriving in about 3 months time, I have decided that we will maximise learning opportunities with minimal preparation on my part - I imagine that I should be busier with the arrival of the new baby! That said, I have implemented a more proper structure for our homeschooling recently (will share that in a later post) to make things more organised for both her learning and my planning.

(i) Colour revision


Well, it's a colourful book like I said and the chameleon on the cover is just begging you to name the colours you see! Alicia enjoyed naming the colours, even without my prompting... naming the colours in Mandarin is the difficult part for her as she refuses to answer my questions in Mandarin... *sigh*

(ii) Catch a 'fly'
adapted from here (you can find other activities from the link but those may require a lot more preparation on your part. Some of the activities are also too simple for Alicia already so I only picked what I thought would work best for us)

You need:

  • a party blower (see pic below)
  • a small piece of velcro (the hard side)
  • small pieces of felt (to simulate the fly)


The chameleon in the story loves to eat flies but I was too lazy to make a fly manipulative so I just gave her whatever small piece of felt I had on hand for this activity. It's probably quite difficult for a child to imagine how the long tongue of the chameleon works, so I think this is an interesting activity to illustrate how the chameleon catches the fly with its tongue (though it is not really exactly the same).


(iii) Make your own colourful chameleon

ok, I got this idea from somewhere but I can't remember where exactly... can't seem to find the link.

Anyway, you need:
  • colourful plastic dividers (I recycled the old ones which were lying around waiting for an opportunity to be recycled)
  • transparencies (the type used for Overhead projectors in the past) - trace the pics of the chameleon from Eric Carle's book
  • marker
  • scissors


happily playing with the cut up colourful dividers - her first encounter with them

Place the transparencies of the pictures of the chameleon around the house and get your preschooler to find them:


Can you see it? :P

Alicia loved to place the transparencies on different surfaces and kept asking me each time, "Mummy, where's the chameleon?"

To make your colourful chameleon, just randomly place the dividers on a flat surface and place the transparency of the pic of the chameleon on top.


It's a different chameleon every time and it can be done over and over again! :)


(iv) Writing practice


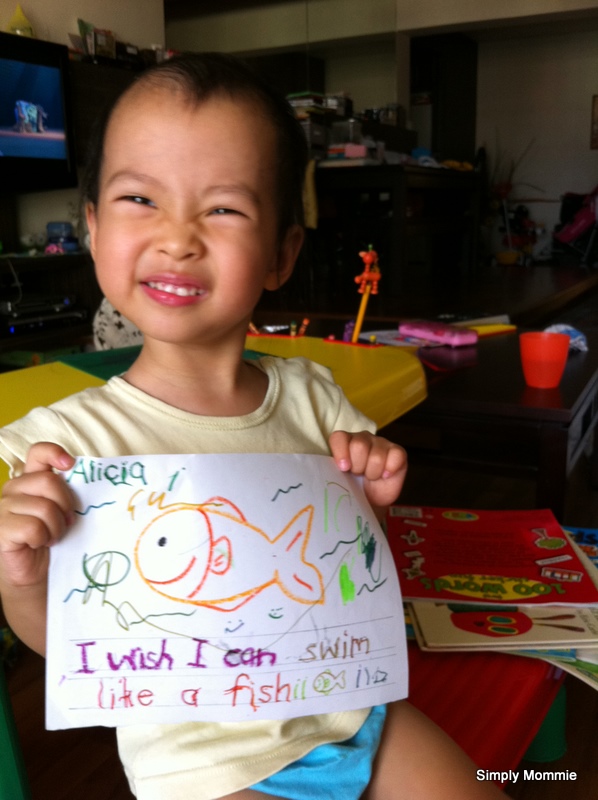
Discuss what the chameleon wanted to be in the story with your preschooler and ask her what she wants to be.

The little ardent swimmer that Alicia is, she naturally chose the fish. :)

As she is still unable to draw a proper fish, I drew a simple one for her. We then wrote a simple sentence about it. (I wrote the sentence for her, and she used a marker to trace the words for writing practice). We had to split this activity up into two sessions (conducted on different days) as she was unwilling to finish the sentence in one sitting.


(v) Art and craft fish + shape matching + writing practice (Mandarin)

Cut out some shapes to form a picture (I chose a fish since it tied in nicely with the above activity). 

Trace the exact shapes onto a sheet of paper to form the picture.

Get the child to place the shapes correctly on the paper first before sticking.

Get your preschooler to stick the shapes on.


Write the word you want your preschooler to trace and let her use a marker to write the word. Guide your child to write in the correct sequence of strokes if writing the chinese word. Name the strokes in Mandarin as you guide your child and get her to say the word when it's completed. 

*You can always adapt this activity to make your child practise writing in English or other languages.


1/31/2011

Activities to go with Mister Seahorse by Eric Carle

I think you already know I like Eric Carle's books... so Mister Seahorse should come as no surprise. :P Actually, Mister Seahorse wasn't in the list of the books I wanted to borrow but I always make it a point to hop over to the CAR section of the library to see if there are any appropriate Eric Carle books for Alicia. I was not disappointed that day as I found a spanking new copy of Mister Seahorse! :)


We did a few activities after reading this book - Alicia really loved the activities! Ironically, she loved the activities more than the book itself. She had fun though with the pages where some of the fishes were camouflaged (Eric Carle used transparencies for some pages so that you could turn the page and see the fish hiding behind). 

Here are the activities we did!:

(i) seahorse counting (and spelling of the number word)


I printed 12 seahorses (the exact pic of Eric Carle's seahorses), laminated them then cut them and trimmed the edges and made just enough alphabets (lower case) needed to spell 1-12 (one number only at any one time). The numbers are from the apple tree learning aid I made earlier and the cloth alphabets (in upper case) are from the Spelling Bee.

I velcro-ed all the parts so that they would stick nicely to the felt should I decide to hang up the piece of the felt as a felt board (felt measuring 64cmx64cm was obtained from the thrift store Daiso - here I folded it into about half its size).


We'd count the seahorses together then place the correct number on the felt.

Next, I'd place either the lower or upper case alphabets on the felt to spell the word and she would find the matching alphabets and place them below/above the alphabets that are used to guide her to spelling the number word. (This part of the activity helps with reinforcing matching upper and lower case alphabets and learning the spelling of the number word)


To further extend this activity to incorporate learning of Mandarin, you could get your tot to match the number to the Mandarin word (those with the Mandarin add-on counting cards for the apple tree learning aid could whip those out - kids get bored counting the same stuff all the time so seahorses could possibly break the monotony of counting apples!)

If you don't have time to make this learning aid, you can try this free resource which is slightly different but still teaches spelling of the number word.

We sang this rhyme (you could sing it as you do the counting activity shown above or sing it at any other time!):

Print out the rhyme here.
The seahorse was drawn by me and coloured by Alicia


(ii) Matching the numeral to the number word

I printed out this free resource from here and got Alicia to do the colouring of the seahorses - which she enjoyed thoroughly!

After printing out the pictures, I glued them onto a cereal box before cutting them out and letting Alicia doodle.


To encourage her to do the matching, I coloured the outline of the boxes with the words and she could choose the colours (we did it one number at a time so she could focus on the spelling of the word - I'd read out the alphabets which spell the word before and during the colouring of the outline of the box). After the colouring's done, she would place the seahorse on the correct box.

I also used phonics to guide her to finding the right word sometimes - e.g. pronouncing the /f/ sound so that she could narrow down her guesses to 'four' and 'five'.


Snapshots of the busy artist:


Doing the matching:

We further decorated the base sheet with paint - she's so good at painting... she really avoided painting inside the boxes! :P So proud of her! (the crayon marks inside the boxes were made before I told her not to colour inside the boxes)


(iii) Art (and Science) - exploring how colours blend together

Just as Eric Carle created his paintings for Mister Seahorse via tissue paper collage, I decided to try out this art activity using kitchen paper towels and food colouring.


Alicia posing with the materials

Mix 1 drop of food colouring with some water and place them in shallow dishes so that it's easier to get hold of the colours during the activity.
(You should try out with one sheet of kitchen towel before conducting this activity with your preschooler to have an idea of how it goes)

Fold the kitchen towel into half, then halve it again to make a square, then dip one corner or side into any dish:


Then dip it in another dish using another side/corner:


Repeat the step with the last colour:


Watch how the colours blend together and discuss what colours your tot sees and how different colours blend to make more colours (e.g. blue and yellow make green).

You can fold your kitchen towel into different shapes - for variety and also for teaching/ reinforcing shapes with your tot:

Alicia made a total of 4 pieces! (The fifth one was my experiment before conducting the activity):


Hanging on the grill to dry!

The dried pieces of art:

Some other activities you could consider doing with your tot can be found from this link.

I decided that it's time to move on to the next book - Corduroy by Don Freeman. :)

1/24/2011

Learning Mandarin: Colours

Alicia used to dislike Mandarin but she's started to pick it up a bit more readily. I thought it was time to revisit some of the learning aids I made for her earlier so that's what we did since about two weeks back. :)

I got her to remove all the chinese word cards from the bilingual learning aids (for colours) and I got her to repeat the chinese words after me. I placed paper clips on each of the chinese word cards and she'd do the fishing using the fishing rod from the fishing learning aid I made for her earlier. After she 'caught' the card, we'd read the words together again before she placed it back on the cards (on the wall).

Look at the happy girl, learning Mandarin! lol.

One of her strange poses... with the fishing rod in her hand

蓝色!

红色!

色!

绿色!

I shan't bore you with more photos, but I'm sure you can see how happy she is doing this simple activity from the photos! :) *happy mummy*

9/06/2010

A 'colourful' evening with Alicia - (teaching of colours)

My teaching philosophy for the very young learners is that learning has to be fun, and if you don't really read my blogposts regularly to find out how teaching is actually done, you might be easily misled to think that I'm stressing out my child by 'forcing' her to learn so many things.

Honestly, all learning so far is made fun for her and tailored to her preferences and activities always take place at a time when she's comfortable and happy to learn. 

On Saturday, I made a new set of learning aids for her to teach word recognition of the colours in both English and Mandarin. Since she already knows all the 12 colours I feature in my learning aid, she doesn't need to learn the concept of different colours and how to pronounce the words in English. 

The learning objectives thus are word-recognition for the English and Mandarin words for various colours and learning to pronounce the Mandarin words. :)

Of course, we don't start with all the colours for a single activity. I go through the cards with her and we start to pick out those she seems keen to learn more about and just focus on those few for that session.

It just so happened that while we were having fun with the word cards - it's really hilarious when she tries to speak Mandarin - she decided to bring her shape sorter over. That didn't spell the end of my activity with her; instead it added more fun! We matched the various coloured shapes to the right word card and the fact that she had a physical object she could handle made it more enjoyable.


Matching the object to the word card (here we focus only on Mandarin)

Subsequently, she got a little bored and started wandering off in search for something else to do. Taking her cue, we walked around the house and in the process, I found a batch of stickers we got from a goodie bag we received that day and it just so happened they were of the same colours as her shape sorter objects! She loves stickers so the next activity just appealed to her instantly.

The aim of the activity was for her to match the sticker to the shape according to the colour and in the process, I try to reinforce as much as possible the pronunciation of the word.


Busy peeling off the sticker


Here's the completed work

After she finished one round of matching, she decided that she'd just stick stickers all over her face... lol... and  I of course just let her go ahead. :)

The main thing about teaching toddlers and young pre-schoolers is to take their cue: when they want to end the activity, just let it go at that and try again when they want to learn again. That way, learning is fun for them rather than stifling.

My little one pasting stickers all over herself:


A blue one on the eye!


Something else for the other eye?


One on the cheek!

Simple Mandarin word cards

Last Saturday during Alicia's last lesson at Julia Gabriel, I had the opportunity to speak to her Mandarin teacher about teaching pedagogy.

I learnt that the learning aids I've been making for Alicia to teach English would also be useful in the teaching of Mandarin and they work on the same principle, just that Mandarin doesn't have alphabets like the English language and hence the approach would have to be thematic instead.

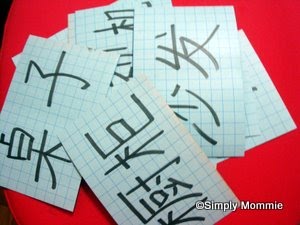
She also gave me the idea that I should just make simple word cards and stick them on familiar objects in the house to help with word recognition. She reinforced the fact that these don't have to be elaborate: just use a marker and some cardstock or vanguard sheet and that's sufficient since the object itself is present. 

I thought that was quite a good idea and since I had some really old vanguard sheets lying in the storeroom, I thought I'd put them to good use. Who cares if they're really old or stained with age? :P 

Here are the cards:


A very economical way to do simple teaching at home, don't you think? :) No need to laminate and go through all that hassle. Hee. Besides, all the printing I've been doing is taking a toll on the ink cartridges and of course, ahem, our pockets. :P

Back to the basics.

Now I just have to get down to sticking them around the house before I can bring Alicia on her daily 'gallery walk' to familiarise her with the words.

You can of course do the same for the teaching of the English language. :)

Have fun with this really budget-friendly idea!

8/13/2010

Parts of the Body learning aid

I received a request from a mummy the other day to make a Parts of the Body learning aid and I thought, well, since I'm gonna teach Alicia that anyway, why not just make one now?

I got to work and here are the learning aids, available in both English and Mandarin.

Alicia LOVES the new learning aids! :P

Check out the details at my blogshop! :)

English version:


Mandarin version:

4/01/2010

More Mandarin (or rather bilingual) learning aids!

Last Saturday I got the term booklet (which shows what will be taught for the term) from Alicia's teachers and I started to conceptualise how I wanted to do up the learning aids for this term. Last term, I only did up the cards for the chinese words taught for the term but I thought I should also try to reinforce the concepts and words taught for the English segment. So after much deliberation, here's what I came up with:


The Chinese and English words are both velcro-ed onto the card so that it gives me the option to just cover the words for one language at a time. According to one of Alicia's chinese teachers, it's better to just teach a concept in Chinese rather than provide an English translation of the concept immediately after telling her the Chinese equivalent. This is to prevent the child from thinking in English and translating concepts into Mandarin later on - which is what I do actually... :D

Anyway, I chose to velcro both sets of words on the card for easy storage and when I want to teach the English words, I just remove the chinese ones and vice versa. I think it should work nicely for us for the term! :)

Here's Alicia getting acquainted with the word cards:


Hop over to Simply Mommie's Precious Handmades to view other interesting learning aids! :)

2/12/2010

Chinese Word Cards

During Mandarin PlayClub, the teachers will go through with the students individually the Chinese words for the week (and those already covered in past weeks) using the prepared word cards. I observed that those 2 years and above were all more or less able to repeat after the teacher for some of the words they have covered in the past five weeks (including the Indian boy who's in the class too! - impressive!). Well, technically, she did learn these words too at Bilingual PlayClub since JG has the same theme across the classes, there wasn't such time and attention set aside for each student in the Bilingual PlayClub since the class is much bigger. Since Alicia has missed half of the term already with this class, and she doesn't have much exposure to Chinese words, I decided to reinforce them with her every morning when it's Speak-Mandarin-time-with-Mummy. :D


And so, I got to work immediately after I put her to nap that day after lesson, and by the time she woke, the word cards were ready! :)


Well, I don't use these like flashcards in the sense of flashing them at her at a quick pace. Rather, on the contrary, it's to slowly read those words to her and get her to understand them. That's what is done at JG anyway.


Here's a pic of my cards!:


Hop over to Simply Mommie's Precious Handmades to view other interesting learning aids! :)

LinkWithin

Related Posts Plugin for WordPress, Blogger...