Lilypie Kids Birthday tickers
Lilypie First Birthday tickers
Lilypie Breastfeeding tickers

1/31/2011

Activities to go with Mister Seahorse by Eric Carle

I think you already know I like Eric Carle's books... so Mister Seahorse should come as no surprise. :P Actually, Mister Seahorse wasn't in the list of the books I wanted to borrow but I always make it a point to hop over to the CAR section of the library to see if there are any appropriate Eric Carle books for Alicia. I was not disappointed that day as I found a spanking new copy of Mister Seahorse! :)


We did a few activities after reading this book - Alicia really loved the activities! Ironically, she loved the activities more than the book itself. She had fun though with the pages where some of the fishes were camouflaged (Eric Carle used transparencies for some pages so that you could turn the page and see the fish hiding behind). 

Here are the activities we did!:

(i) seahorse counting (and spelling of the number word)


I printed 12 seahorses (the exact pic of Eric Carle's seahorses), laminated them then cut them and trimmed the edges and made just enough alphabets (lower case) needed to spell 1-12 (one number only at any one time). The numbers are from the apple tree learning aid I made earlier and the cloth alphabets (in upper case) are from the Spelling Bee.

I velcro-ed all the parts so that they would stick nicely to the felt should I decide to hang up the piece of the felt as a felt board (felt measuring 64cmx64cm was obtained from the thrift store Daiso - here I folded it into about half its size).


We'd count the seahorses together then place the correct number on the felt.

Next, I'd place either the lower or upper case alphabets on the felt to spell the word and she would find the matching alphabets and place them below/above the alphabets that are used to guide her to spelling the number word. (This part of the activity helps with reinforcing matching upper and lower case alphabets and learning the spelling of the number word)


To further extend this activity to incorporate learning of Mandarin, you could get your tot to match the number to the Mandarin word (those with the Mandarin add-on counting cards for the apple tree learning aid could whip those out - kids get bored counting the same stuff all the time so seahorses could possibly break the monotony of counting apples!)

If you don't have time to make this learning aid, you can try this free resource which is slightly different but still teaches spelling of the number word.

We sang this rhyme (you could sing it as you do the counting activity shown above or sing it at any other time!):

Print out the rhyme here.
The seahorse was drawn by me and coloured by Alicia


(ii) Matching the numeral to the number word

I printed out this free resource from here and got Alicia to do the colouring of the seahorses - which she enjoyed thoroughly!

After printing out the pictures, I glued them onto a cereal box before cutting them out and letting Alicia doodle.


To encourage her to do the matching, I coloured the outline of the boxes with the words and she could choose the colours (we did it one number at a time so she could focus on the spelling of the word - I'd read out the alphabets which spell the word before and during the colouring of the outline of the box). After the colouring's done, she would place the seahorse on the correct box.

I also used phonics to guide her to finding the right word sometimes - e.g. pronouncing the /f/ sound so that she could narrow down her guesses to 'four' and 'five'.


Snapshots of the busy artist:


Doing the matching:

We further decorated the base sheet with paint - she's so good at painting... she really avoided painting inside the boxes! :P So proud of her! (the crayon marks inside the boxes were made before I told her not to colour inside the boxes)


(iii) Art (and Science) - exploring how colours blend together

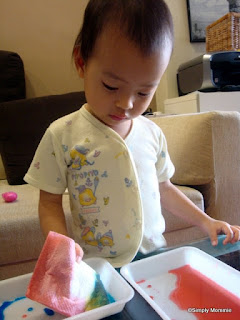
Just as Eric Carle created his paintings for Mister Seahorse via tissue paper collage, I decided to try out this art activity using kitchen paper towels and food colouring.


Alicia posing with the materials

Mix 1 drop of food colouring with some water and place them in shallow dishes so that it's easier to get hold of the colours during the activity.
(You should try out with one sheet of kitchen towel before conducting this activity with your preschooler to have an idea of how it goes)

Fold the kitchen towel into half, then halve it again to make a square, then dip one corner or side into any dish:


Then dip it in another dish using another side/corner:


Repeat the step with the last colour:


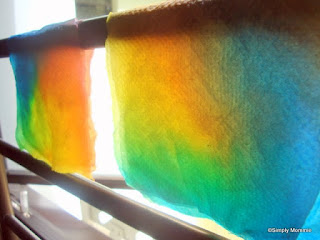
Watch how the colours blend together and discuss what colours your tot sees and how different colours blend to make more colours (e.g. blue and yellow make green).

You can fold your kitchen towel into different shapes - for variety and also for teaching/ reinforcing shapes with your tot:

Alicia made a total of 4 pieces! (The fifth one was my experiment before conducting the activity):


Hanging on the grill to dry!

The dried pieces of art:

Some other activities you could consider doing with your tot can be found from this link.

I decided that it's time to move on to the next book - Corduroy by Don Freeman. :)

1/27/2011

Wild Spinach Soup

I bought this bunch of wild spinach from the vegetable stall at the wet market the other day. It's basically the same as normal spinach (heng cai in cantonese and xian4 cai4 in Mandarin) just that it's the erm, wild version. :O


It's got these flowery bits that are not normally found in usual spinach bunches :P

Taste-wise, I'd say it's almost the same, maybe a bit more earthy taste than the usual spinach... :)


Prepare the soup in the same way as the usual spinach soup!

Activities to go with Goodnight Moon by Margaret Wise Brown

Margaret Wise Brown's Goodnight Moon is a book that even very young children can easily relate to - a little bunny in his great green room saying goodnight to all the things around him. It is a classic bedtime book, with simple, soothing rhyme and rhythm.


The illustrations are in my opinion quite noteworthy. When the writer wants to focus on the room, bright colours are used and when focusing on details, such as the picture of the cow jumping over the moon, the illustrations are in black and white. Furthermore, as the story progresses, you will (or might) notice the green room darkening slowly. The time shown on the clock changes too as you turn the page and the quirky little mouse changes its position - Alicia loves to spot the mouse! :P The bunny changes his position in bed, the kittens take the place of the old lady on the rocking chair... 

Here are a couple of activities we did after reading the book:

(i) finding all the items mentioned in the book in the house (as far as possible)

Here's Alicia with her mittens!

You can see that she's really very pleased with the activity :P


A snapshot of but a few things we gathered - we had plenty more! :)

Getting the child to find physical objects or related objects to those mentioned in the book is a simple activity that the tot will gladly participate in. It allows the learner to be active in making the connections with what she sees on the page and what she has in her surroundings, not to mention that it's great for kinaesthetic learners!

After gathering all the items, read the story to the child again and when the item is mentioned, get the child to pick it out from the stash you probably have on the floor. :)

(ii) This is an activity that I found from here.

I decided to save printer ink and drew the pictures myself, together with Alicia.  I realise that she finds it more engaging to watch and guess what mummy is drawing next. So what I did was to draw the pictures on a piece of paper (bearing in mind the size of the pocket chart), paste it on a cereal box then cut out the individual cards - and they're done! :) 

I bought a pocket chart from Daiso last year and it's come in handy for this activity. :)


This activity is more for teaching word recognition - which will take a while and lots of revision! :)

(Alicia has already recognised the word "Goodnight" due to the frequent appearance of the word) 

You can remove either the picture or the word (leave "Goodnight" alone) and get your preschooler to fill in the blank with the right card.

Do not attempt to do too many words at a time. (I have a total of 15 words, focus on maybe 3-4 at a time)


(iii) Revise the rhyme "Hey Diddle Diddle" - that's where the cow jumped over the moon! :)


Other activities you can consider:

  • Hiding a favourite toy or a toy mouse and getting the child to look for it (similar to spotting the mouse in the book)
  • Incorporating the "Goodnight ___" phrase to your kid's bedtime routine.
  • Add a twist to the phrase: say "Good Morning ____" instead when your child wakes - if you aren't in a rush!
That's what we did for Goodnight Moon! Stay tuned for activities for Mister Seahorse by Eric Carle! :)


1/25/2011

The direction for homeschooling 2011: literature-based learning!

I had been sitting on homeschooling for quite a long while - we took a break since Dec 2010 and it took me a long time to get my rusty engine going again. For the first two weeks of Jan 2011, I was really pondering what direction to take for the year and without any direction, I felt totally unmotivated and lost.

While I was still searching for my direction, I started with simple activities to warm up the old bones, which I shared earlier here, here and here.

I finally decided on the direction for homeschooling when I spoke to my dear friend Pauline from myplayschool.net a couple of weeks ago. It was then I decided that I'd take the literature-based approach for this year and I started reading up more about what to read with Alicia!

I've read about the literature-based approach before but I shelved it earlier on since I had my own ideas about what to teach Alicia at the start. Now that she's familiar with alphabets and concepts of colours, shapes, body parts etc., I felt that it was quite timely to embark on literature-based learning where she could really see how all that she's learnt so far come together in books (and not to mention life)! This approach also enables me to instill what I believe to be quite fundamental in a good learner - the love for reading. Apart from teaching literacy, I find that it is easy to weave in other disciplines, which makes it perfect for a homeschooled preschooler!

I've since tried it out with Alicia for a few books and it has been truly lovely! She enjoys the books and the activities and asks to read many times a day! :) Stay tuned for updates!

1/24/2011

Matching upper and lower case (with stickers)

Alicia chanced upon some stickers a few days back and insisted she wanted to stick them somewhere. Since she was intent on using the stickers, I decided that I should not just let the stickers go to waste... hence this on-the-spot activity! :P

It's a simple activity that anyone can do up and it requires little preparation so it's great for parents strapped for time. :) I first came across a similar activity at Activity Mom so when Alicia asked to play with stickers, I immediately decided that it was time to try this activity out with her.

All you need:
  • a piece of paper - preferably not in the colour of any of the stickers you're using (I used a scrap piece of construction paper :) )
  • markers
  • pen
  • liquid paper or silver pen (optional - for writing on dark coloured stickers (I didn't have it on hand, if not I'd have used it))
  • labelling stickers

Simply write the upper/ lower case letters on the paper and draw a circle around each alphabet and write a set of alphabets (upper/lower case) on the stickers. Here I wrote the upper case on the paper and the lower case on the stickers but you can choose to do it the other way round. It really depends on what your focus is.

The extra marks on the paper are Alicia's doodles - she wanted to draw on the paper when she saw me writing!

Get your tot to pick out any letter on the paper then look for the matching alphabet on the stickers. (That's a lot simpler than looking for the alphabet on the paper since the letters are all mixed up!)


 Stick it on!

The next two photos were taken by Alicia! I thought they captured quite a nice angle of the materials we used for the activity though they were a bit blurry....


Well, it's normal that your tot can't sit through all 26 letters! The activity can always be revisited and completed over a few days! :)

Homemade fish finger(s)

After Alicia showed signs of getting sick of her usual baked cod, I decided to add something new to her menu - something which my hubby has been stopping me from adding since a long time ago: breaded cod. :P He's always saying that it's too heaty etc. and since she was very young back then, I also thought it wise to keep fried food to a minimum. Now that she's reached the 30months mark this month, I felt that it was time. :)

I didn't photograph the fish fingers, but here's Alicia eating it on one occasion (scroll down for recipe):

Getting ready to eat! AHHHHH!!

Picking the crumbs to eat first...

Posing with her fish finger :)


Homemade fish finger 
serves 1 tot

Ingredients:
  • 1 slice of cod (about 60g)
  • 1 egg, beaten
  • breadcrumbs (probably about 2 tbsp - I didn't measure)
  • a teeny weeny pinch of salt
  • a little ground white pepper
  • cornflour
  • oil


Method:
  1. Mix the breadcrumbs with the salt and pepper evenly.
  2. Place the slice of cod into the beaten egg, then coat it with cornflour.
  3. Return the cod into the egg then coat it with breadcrumbs.
  4. Add some oil into a non-stick pan and shallow fry the fish finger till golden brown before turning over to brown the other side.
  5. Place the fish on a sheet of kitchen towel to remove any excess oil.
  6. Let it cool before serving to prevent burns.
  7. (You can fry an omelette for yourself/ your tot with the remaining egg.)
You can repeat the breading process for more fish fingers before frying them.

1 beaten egg can be used to coat 8-10 fish fingers.


Learning Mandarin: Colours

Alicia used to dislike Mandarin but she's started to pick it up a bit more readily. I thought it was time to revisit some of the learning aids I made for her earlier so that's what we did since about two weeks back. :)

I got her to remove all the chinese word cards from the bilingual learning aids (for colours) and I got her to repeat the chinese words after me. I placed paper clips on each of the chinese word cards and she'd do the fishing using the fishing rod from the fishing learning aid I made for her earlier. After she 'caught' the card, we'd read the words together again before she placed it back on the cards (on the wall).

Look at the happy girl, learning Mandarin! lol.

One of her strange poses... with the fishing rod in her hand

蓝色!

红色!

色!

绿色!

I shan't bore you with more photos, but I'm sure you can see how happy she is doing this simple activity from the photos! :) *happy mummy*

Learning to count with ice-cubes

Alicia doesn't really like numbers or math for that matter... so I try to vary the way I teach her how to count.

Here's an activity I did with her about two weeks ago: counting coloured ice-cubes.

What you need:

  • ice-cubes in two colours (colour of ice-cubes are up to your preference: I had 6 blue and 6 red ice-cubes)
  • a couple of scoops
  • two big bowls or two basins
  • a rag (just in case)

Set up the activity as shown:

Besides the obvious fun the tot derives from scooping ice-cubes (read: improving fine motor skills) and counting ice-cubes as your tot scoops each one over to the other basin, you can also give specific instructions to your tot such as 'scoop a blue ice-cube for mummy' or 'scoop two red ice-cubes'. 

Questions you can ask (for math): 
(after scooping 2 blue ice-cubes and 1 red ice-cube) 
'how many blue/red ice-cubes are there (in the new basin)?' 
'how many ice-cubes are there altogether?'

(after scooping 1 or 2 more ice-cubes) 
'How many ice-cubes are there now altogether?'

You can get your tot to touch ice-cubes as well for the tactile experience.

Once the ice-cubes start melting and the colours start to mix, you can talk about colour changes (science).

Weird pose!


She enjoys pouring the water and ice-cubes after she's scooped all the ice-cubes over


And she repeats the activity over and over...........

止咳化痰饮料 (drink for ridding cough and phlegm)

I've been suffering from cough for quite awhile since I caught the flu bug from Alicia earlier in the year.

This is one of the drinks I tried brewing in my desperate attempt to get well. I'm not sure how many times I'm supposed to drink it before I get well, but I only tried twice and I stopped - cough didn't go away, but phlegm did though. :)

Anyway, my doctor just told me yesterday that my cough is more likely due to throat and airway sensitivity so he didn't prescribe me with new cough syrup; instead he offered me medication for my throat. I hope it works!


止咳化痰饮料 (drink for ridding cough and phlegm)


Ingredients:

  • 1/2 liang chuan bei (贝)
  • 1tsp bitter almond
  • 1tsp sweet almond
  • 4 figs
  • 1 dried orange (ju bing)
  • 1L water


Method:

  1. Rinse the herbs.
  2. Place herbs in 1L of water and bring to a boil.
  3. Simmer for 45min and it's done :)

For tot's consumption:
I checked with the TCM hall and the assistant informed me that this drink is suitable for tots suffering from cough and phlegm but in small amounts. :)

Fun with syringes

Alicia was down with flu earlier in the year and she's since been hooked on syringes - she even requests for water to be fed via syringe sometimes, long after she recovered from flu! Well, as long as water gets into that little mouth, that's more important for me! :P

Since she loves syringes, I thought well, why not just let her play with them and figure out how syringes work? It makes a great activity for her since she loves waterplay and syringes have just become the newest addition to the little basin!

All you need is a small tub of water, a couple of syringes and you're good to go! :) 

Learning to use a syringe can be really interesting for a tot - learning the mechanics of getting the water into the syringe and of course, their favourite part would be to 'shoot' the water out from it! 

My little one posing for cam:


Done with posing, she's getting ready for the activity


LinkWithin

Related Posts Plugin for WordPress, Blogger...